Tutorial
This page provides a brief tutorial of Scientech's ePHQ software solution. This tutorial does not cover SSIS' ePHQ Administration (EPHQADMIN) form or integration with SSIS.
This section is for people who have been invited to complete a Personal History Questionnaire (PHQ). Invitations are typically
emailed to you by the site at which you requested access. If you have not received an invitation, or do not have a link to your PHQ,
reach out to site point-of-contact (POC).
Click the link that was provided to you (usually in an email), enter your SECURE ID and then press the Submit button.
This section describes the navigational features of the ePHQ application.
Near the top of each page is a progress bar. This bar shows you: which page you're on, how many pages you've completed
and how many pages still need to be completed.
A green box indicates that the page is complete. You can hover over the box to see the name of the page. You can
also click the box to go back to that page.
A black box indicates the page you're currently on.
A white box indicates pages that still need to be completed.

Near the top and bottom of each page are navigational buttons labelled Previous and Next.
Clicking the Previous button will take to you the last page you completed.
Clicking the Next button will take you to the next page. Note: You will only be taken to the
next page if you've correctly populated all of the required fields on the current page. If a required field
is missing a value, or the value is incorrect, the field will turn red and you will not be able to move
on to the next page until you enter the correct information.
The Next button also saves the data you entered. This is useful if you lose your internet connection or
need to complete your PHQ at a later date.
Near the bottom of each page is a button labelled Save & Close. Clicking this button
will save the data you already entered and allow you to complete your PHQ at a later date.
Note: Most sites delete incomplete PHQs after a certain number of days, usually seven (7). Please
be sure to complete your PHQ in a timely manner.
This section describes the error checking features of the ePHQ application.
The ePHQ application ensures that all required data is filled in and in the proper format. Information is
checked for errors either when the Next (or Previous) button is clicked
or when you move on to a different field.
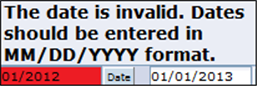
When an error is detected the field will turn red. Clicking in the field will display
a message in regards the nature of the error.
Note: When the Next button is clicked and there is an error on the page, the application
will not allow you to move onto the next page. The error must be resolved before continuing.
The ePHQ application ensures that there are no gaps in your employment, unemployment, education
and military history. After you have entered all of the history required, the application will
prompt you to resolve any gaps. For instance, if you are required to provide seven (7) years of
history starting with January 1, 2006 but only provide information for 01/01/2006-05/01/2007 and
07/01/2007-01/01/2013 you have left a gap from 05/02/2007 - 06/30/2007. The application will prompt
you to fill in the gap.
Below is an example of a PHQ that contains gaps. The Date Validation section displays
the history you entered. The lines highlighted in red show you where the gaps are. The Possible Gap Locations
section provides you with easy access to your education, employment and military history. Clicking on the link
will take you back to that page in the PHQ.
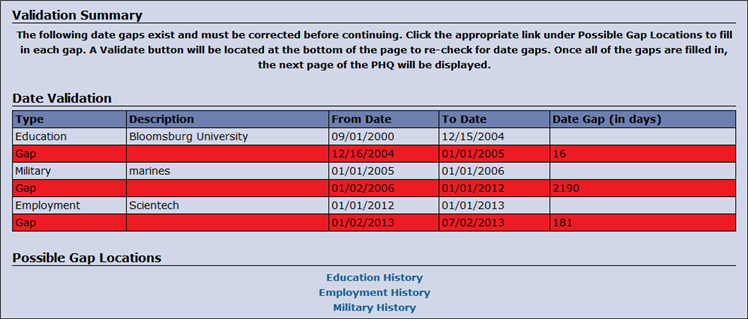
In this example, there's a gap from 12/16/2004 - 01/01/2005. To fill this gap, or any gap,
I need to add education, employment or military history. In this case, we're going to fill the
gap by changing the day military service began. To do this, click the Military History link
in the Possible Gap Locations section. The application will take you to the military history page of the PHQ.
On that page, update the From Date of the Service Period to 12/16/2004. Next, press the Validate
button located near the bottom of the screen. You will then be brought back to the Validation Summary page
and the information in the Date Validation section will be updated. Alternatively, if there are no more gaps,
you will be brought to the next, uncompleted, page of the PHQ.
Near the bottom of each page is a button labelled Help. Clicking this button
display the help file prepared by the site. If you need further assistance filling out
the PHQ please reach out to your site point-of-contact (POC).
This section is for people responsible for administering the ePHQ application. Administration from within SSIS and SSIS
integration is not covered.
Click the administrative link that was provided to you then, enter your administrative username and password. Finally, click the Submit button.
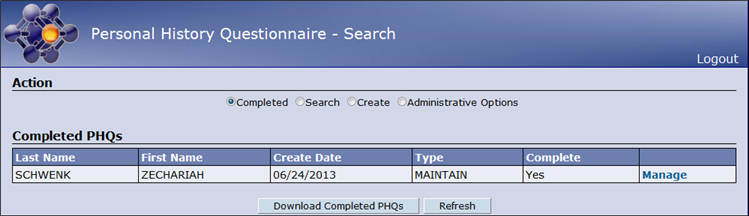
This panel allows a user with administrative access to manage the application. The top portion of the page lists all of the actions that may be taken. Those actions are:
Completed, Search, Create and Administrative Options. Clicking the radio button next to an action will perform the action.
By default the Completed action is performed. This action shows all of the completed PHQs that still reside on the server. You are also able
to click the Download Completed PHQs button to download a ZIP file that contains all of the completed PHQs. The Refresh button is used to
refresh the data displayed in the Completed PHQs table.
The Search action allows you to search for all of the PHQs that remain on the server. To perform a search,
populate any of the fields in the Search section and then click the Search button. The results of
your query will be displayed in the Results section.
When PHQs are found that match your search criteria, the Results section will contain a table with the following columns:
- Last Name: The applicant's last name.
- First Name: The applicant's first name.
- Create Date: The date the PHQ was created.
- Type: The type (aka Basis for Action or Process Type) of PHQ.
- Complete: Whether the PHQ is completed (YES or NO) or LOCKED.
- Manage link (unlabeled): A link that opens the "Manage" window.
The Create action allows you to create a PHQ. To create a PHQ, populate all of the fields and click the Create button.
All of the fields, except for E-mail address are required. Once created, the Manage window will appear.
The Manage window is broken into three sections: Details, Link, and Send Email.
The Details section displays the name of the applicant, the type of PHQ, the date the PHQ was created
and the PHQ's status.
If the PHQ were locked, an Unlock link would be displayed next to the PHQ's status.
If the PHQ were complete, a Download PDF link would be displayed next to the PHQ's status.
The Link section displays the link to the applicant's PHQ.
The Send Email section is used to send the applicant an invitation to complete a PHQ. To send (or re-send) the
invitation, enter the applicant's email address into the E-mail address field and click the Send button.
The Administrative Options action allows an administrative user to manage certain options related to the
ePHQ application. Specifically, an administrative user can:
- Create an administrative user
- Delete an administrative user
- Unlock an administrative user's account
- Change their password
- Change the PDF passwords
The Create User action allows an administrative user to create a new administrative user. Enter the user's
username, password and their password a second time and then click the Create User button.
The Delete User action allows an administrative user to delete an administrative user. Enter the user's
username then click the Delete User button.
The Unlock User action allows an administrative user to unlock an administrative user's account. Enter the user's
username then click the Unlock User button.
The Change User Password action allows an administrative user to change his password. Enter the old password,
the new password, the new password a second time and then click the Change Password button.
The Change PDF Passwords action allows an administrative user to change the passwords used to secure the PDF files generated
by ePHQ. There are two passwords: the user password and the owner password. Both passwords must be changed at the same time.
To change the password, fill in all four fields and then click the Change PDF Passwords button.
